Construction: Methods & Results


Hulls:

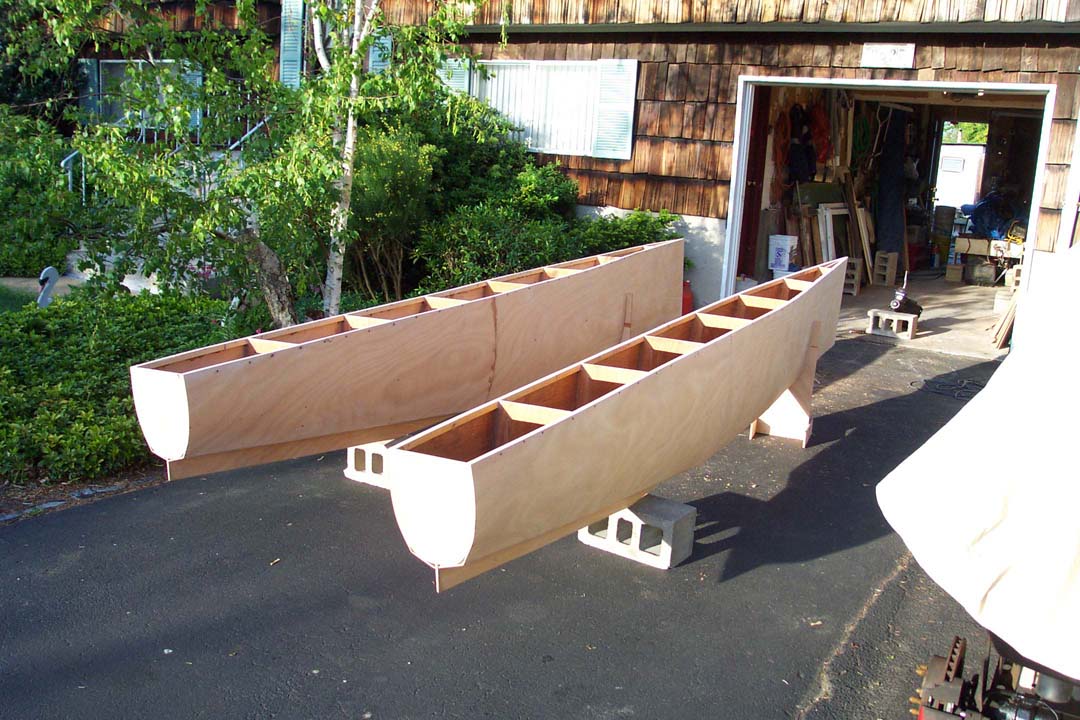
    The hulls are built from marine grade mahogany plywood.  The 1/8" thick skins are epoxied over a frame of bulkheads and the skeg made from 3/8" plywood.  The hulls are held together with epoxy only, not fasteners required!  To see detailed photos of the hull building process see the photo section below.  


Back to top

Carbon & Fiberglass Spars:

    The carbon fiber spars (masts and crossbeams) and fiberglass spars (boom, yard, slave bar, rudder arms 7 tiller) were all circular in cross section so they were relatively easy to make using the following procedure shown to me by my friend and fellow cat sailor Steve Bellavia.  

    This process requires a long pole set on a rotating motor to act as the mold for the spar.  The outer diameter of the pole becomes the inner diameter of the spar.  

  1. Choose a pole (copper tubing or similar material) of the appropriate diameter and length for the tube you want to make.  It must be stiff enough no to flex under it's own weight or else you will get wrinkles in the final part.  
  2. Support the pole at each end in a way that allows it to roll easily (two wheels mounted next to each other work well).  One end must be connected to a motor so that the pole can be rotated at about 1 revolution per second.  

pole_setup.jpg (2818756 bytes)    pole_wheels.jpg (3990100 bytes)

  1. Using small pieces of scotch tape, tape a layer of paper to the pole (this will make is possible to slide the spar off the pole when it's cured).  
  2. Now tape a layer of plastic (polyethylene film from McMaster works well) over that to keep the epoxy from soaking into the paper and sticking to the pole.  
  3. Cut the cloth (fiberglass of carbon fiber) to the desired length and width (the width of the material and the pole diameter will determine the final tube thickness).  
  4. Turn on the rotation and paint a thin layer of epoxy over the plastic sheet.  
  5. Turn off the rotation and lay one edge of the cloth along the wetted pole (wrap it around enough so that it doesn't fall off - the smaller the pole the harder this is).  
  6. Begin painting on epoxy over the cloth to wet it out.  
  7. Manually rotate the pole so that more cloth is wrapped around it and wet out the newly wrapped cloth with more epoxy.  
  8. Continue to repeat this until all of the cloth is wrapped around the pole.  
  9. Now turn on the rotation and use a squeegee to remove excess epoxy and tighten the wrap of the cloth around the pole.  
  10. Leave the pole rotating until the epoxy is cured.  
  11. When cured, you should be able to slide your new spar off the pole.  


Back to top

Rudders:

    To save weight the rudders are hollow made from the same 1/8" plywood as the hulls.  Building them was surprisingly easy thanks again to Steve's advise and a little testing.  The rudders are made from 2 skin pieces (one for each side), one rectangular piece of basswood running down the middle and one hardwood dowel near the leading edge.  The rectangle and dowel do a nice job of turning the two flat skins into a foil shape.  Forming the rudders requires a jig/clamping system to hold all the parts of the rudder together while the epoxy cures.  A 12" test section I made first and a sample drawing of the rudder construction is shown below.  

rudder_drawing.jpg (80153 bytes)    rudder_test.jpg (271611 bytes)    rudder_cross_section.jpg (242540 bytes)

Process plan:

  1. Cut skins to the proper size.
  2. Now to make the trailing edge nice and sharp, you will need to clamp the two skins down on top of each other with the long edges parallel but offset a small distance (for the chord length I used I needed 1 1/4") and sand the edge down until the edges of both skins are flush with one another (just like sanding to make a scarf joint).  When you are done, the surface you sanded will fit together to form the trailing edge of the foil.  
  3. Epoxy coat inside surfaces because you can't do it once the rudder is together!
  4. Get inner rectangle (5/8" x 1") and dowel (3/8" diameter) and epoxy coat.  
  5. Build jig/clamps shown below.  The ones in the middle squeeze the skins down over the rectangle and dowel and the ones on each end hold the rectangle and dowel in place.  

rudder_jig.jpg (259802 bytes)

  1. Epoxy parts together with jig.  The wooden clamps I made are spaced about 12" apart and screwed together.  To clamp the portions of the skins that are between the wooden clamps, use some stiff block of wood and regular clamps in the leading and trailing edges and use plastic strips to keep them from sticking to the rudder.  You may also need to staple the skins to the inner rectangle to get a good bond.  


  1. Fill in Leading edge with epoxy and filler of your choice (saw dust is good if you will use a clear finish on the rudders).  Hint: the easiest way to fill the leading edge is to slop on epoxy with filler and then cover the whole edge with a single sheet of plastic that will hold the epoxy in place as it cures.  When it's cured you just sand it flush with the skins.  
  2. Sand leading edge round and smooth and the trailing edge straight and sharp.  
  3. Cut rudder at top and bottom to desired length and shape.  
  4. Drill the pivot hole for the rudder oversized through the inner rectangle.  Then you can fill that with epoxy  and drill it out again to the correct size so that the pin rotates on a nice epoxy surface instead of wood.  
  5. Cut out and epoxy small skins over top and bottom to seal ends and sand smooth.  
  6. Now you're ready to finish your rudders with epoxy and vanish/paint.  
  7. Don't forget to Install some drain plugs so you can get water out if it manages to get in!  

rudder_const_4.jpg (60153 bytes)    rudder_const_5.jpg (87426 bytes)

Back to top

Construction Photos:

Here is a photo history of the building of the hulls and the assembly of the final boat.  

const_1.jpg (99644 bytes)

Sand 1/8" plywood to make scarf joints

Cut out bulkheads from 3/8" plywood

Cut out skeg/hull stem from 3/8" ply

Rip Sitka spruce strips for stringers

Assemble skeg, bulkheads and stringers

Transition stringers to sharp bow

Epoxy stringers to bulkheads (use nail at temporary clamp)

More frame assembly

Skeg/bulkhead joint detail

More frame Assembly

Finished, sanded frames

Begin epoxy coating frames & cut out hull skins

Clamp and epoxy skins to frame (use screws to temporarily hold skin to frame)

More Clamping

Epoxy on bottom skin piece (the curve radius was too small for a single piece) and reinforce joint with fiberglass

Take outside and sand and remove flash from skins

Sanded hull upside down

Both hulls sanded with skins attached

Both hulls sanded with skins attached

Shot of hull interior all coated with epoxy

Deck Stringers and mast tang attachment support

Deck stringers epoxied in place

More detail of some stringers

Deck skins cut out with inside surface epoxy coated

Shaving off the flash from the decks

Decked hulls sanded and ready for final details

Drill holes for access ports

Plywood strips with grooves for tramp attachment

Brackets for crossbeam attachments

Test fit hulls and carbon fiber crossbeams I made

Test fit hulls and crossbeams

Make fiberglass tubes for boom, yard, slave bar, tiller

Coat hulls with 3 coats epoxy

Test fit rudder brackets and rudders

Test fit bipod mast to assembled hulls

const_36.jpg (437550 bytes)

Test fit bipod mast to assembled hulls

sail_const_1.jpg (89087 bytes)

Lay out sail material & tape joints

sail_const_1.jpg (89087 bytes)

Cut to crab claw shape and sew joints

sail_const_1.jpg (89087 bytes)

Sew on sleeves and insert spars

test_assem_1.jpg (89087 bytes)

Test assemble masts, hulls and sail

test_assem_2.jpg (89087 bytes)

Test assemble masts, hulls and sail

test_assem_3.jpg (89087 bytes)

Test assemble masts, hulls and sail

test_assem_4.jpg (89087 bytes)

Test assemble masts, hulls and sail

test_assem_5.jpg (89087 bytes)

Sail tack close-up

test_assem_6.jpg (89087 bytes)

Test out trampoline

test_assem_7.jpg (89087 bytes)

Test assemble masts, hulls and sail

To contact me write to kseluga@rclandsailing.com